
This document outlines how the development cycle within git, branch naming convention, tagging standard when to do code review, branching model as well as forking repositories. Netfluence will implement a new way of creating separate client repository but retains the ability to update it’s VPB module whenever the main VPB repository deployed a new version.
This flow is based on “gitflow” but tweaked to reflect how Netfluence works and connect it on how to handle client repositories.
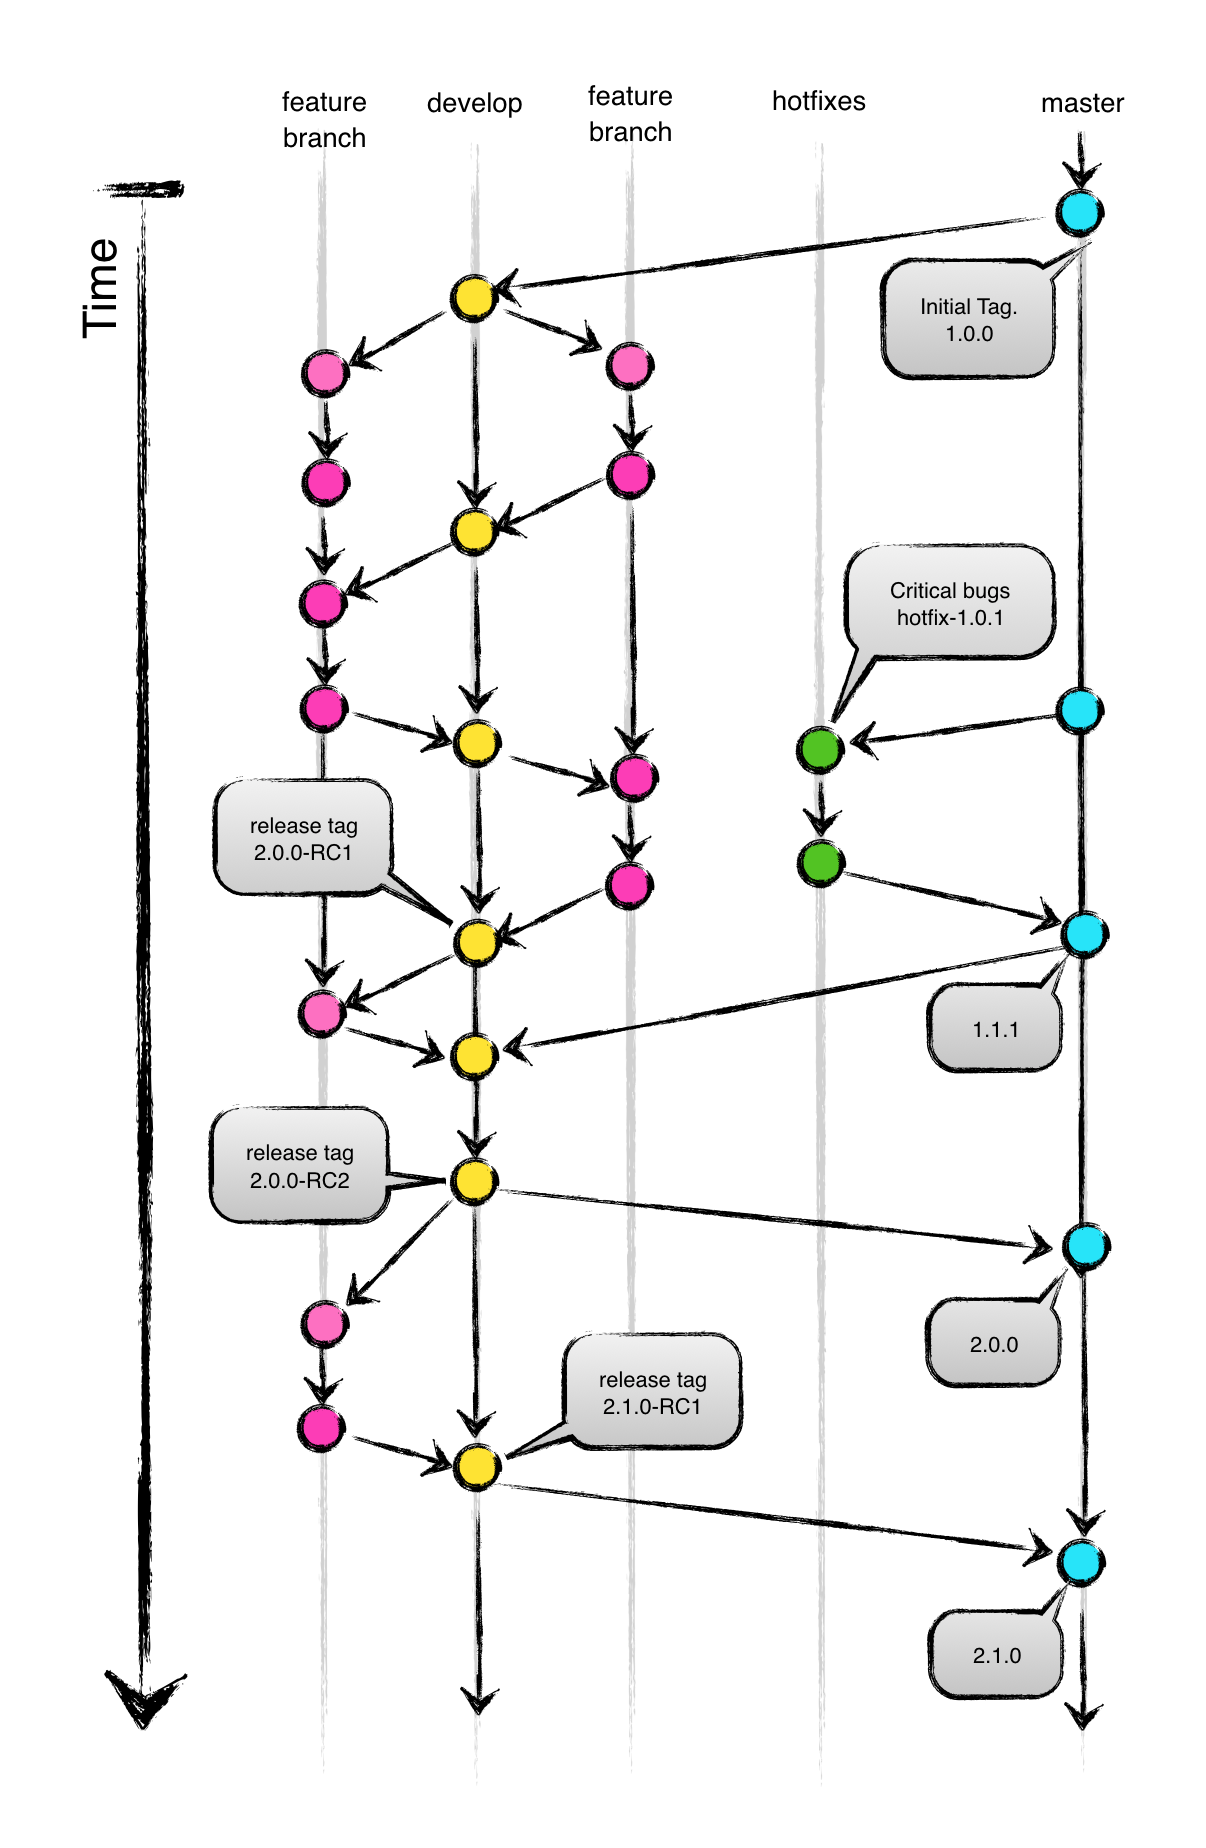
The central repo holds two main branches with an infinite lifetime:
- - master
- - develop
The master branch at origin should be familiar to every Git user. Parallel to the master branch, another branch exists called develop.
origin/master is the main branch where the source code of HEAD always reflects a production-ready state. We also maintain this branch to be the upstream repository when forking our repository for client work.
origin/develop is the main branch where the source code of HEAD always reflects a state with the latest delivered development changes for the next release.
When the source code in the develop branch reaches a stable point and is ready to be released, all of the changes should be merged back into master and then tagged with a release number.
Supporting branches
Our development model uses a variety of supporting branches to aid parallel development between team members, ease tracking of features, prepare for production releases and to assist in quickly fixing live production problems. These branches are to be closed once we have created a stable release
The different types of branches we may use are: Feature branches, hotfix branches
May branch off from:
develop
Must merge back into:
develop
Branch naming convention:
feature-<featureID> except master, develop, or hotfix-*
Features are branched out from origin/develop. Features should be small enough that you can close the branch as soon as it has been merged. Chunk big features to smaller feature branches. The scope of work should be broken down to task and assigned a small ID for naming feature branches.
Shared remote branches should be avoided. All changes should be made available on origin/develop and other developers should build their changes on top of that by continuously updating their working copies.
example:
| Task ID | Task | Branch Name |
| AA1 | Add a field that enables users to add google map API | feature-AA1 |
| AA2 | Create a VPB Module that showcase Instagram feed | feature-AA2 |
Hotfixes branch is for fixing critical bugs. This is the only time you can branch out and merge directly to master. It is a necessity to act immediately when an undesired broken state of a live production version appeared. When a critical bug in a production version must be resolved immediately, a hotfix branch may be branched off from the corresponding tag on the master branch that marks the production version.
Incorporating a finished feature to develop
Finished features may be merged into the develop branch by creating a Pull Request for review and approval.
Important: Merge your changes as soon as possible. Never wait for your changes to become so big that it becomes hard to merge.
Pull Requests Approval and Code Review
At least one developer (preferably the dev lead) should check the changes before merging it to the development HEAD. That developer will also determine if the changes should be squashed. This process gives us the time to think through a code and check if that change will harm existing codes. This is also the time that the team can discuss and explain why the changesets are implemented that way.
Squash your changes
This step is not always necessary but is required when your commit history is full of small, unimportant commits (such as "Fix CSS", "Fix text", or "xxx"). It involves taking all the commits you've made on your branch and squashing them all into one, larger commit. Doing this makes it easier for you to resolve conflicts while performing the rebase, and easier for us to review your pull request.
Release Candidates / Quality Control
You can only create release candidate tags in the develop branch. The format would be <VERSION>-RC<ITERATION> 1.5.2-RC1, 2.8.0-RC2
The release candidate tag will tested by the QA using their tools and processes (visual test, functional, etc) in the necessary environment.
Creating Production Ready Release
You can only create release tags in the master branch. The tag format would be <MAJOR>.<MINOR>.<BUGFIX>
Once QA has passed the release candidate, you can now merge it to the master and tag a release. This will now be deployed to the live environment and be tested again by QA. If failed the team should asses if the fix can be fixed right away by creating a hot fix or roll back and fix the bug later.
Getting latest changes from origin/develop to your local copy
All other developers involved in a project should always merge the latest change set from origin/develop to their local copy as soon as a pull request has been merged.
Update local develop repo from origin
$ git checkout develop
$ git pull origin develop
Get all changes from develop and put all your changes to the tip of your commit timeline
$ git checkout feature-AA1
$ git rebase develop
$ git push -f origin feature-AA1
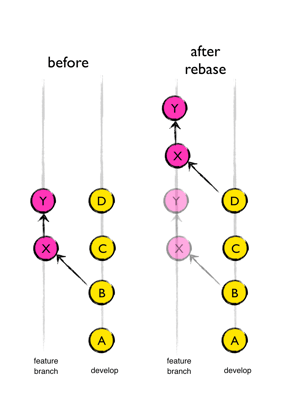
The major benefit of rebasing is that you get a much cleaner project history. First, it eliminates the unnecessary merge commits required by git merge. Rebasing also results in a perfectly linear project history — you can follow the tip of feature to the beginning of the project without any forks.
When you do a rebase, you are changing the history of your branch. As a result, if you try to do a normal git push after a rebase, Git will reject it because there isn't a direct path from the commit on the server to the commit on your branch. Instead, you'll need to use the -f or --force flag.
.
.
.
.
Client Work Project Development Workflow
Maintaining origin/master for client work
The origin/master of the main repository should always include the latest stable release as this will serve as the upstream or the mirrored branch for the client repository. This ensures that all forked client repository can be updated with a stable codebase and client work will affect the main repository.
By forking the main repo, you can create a pull request that the main repository can be selected within the “destination” of your pull request
.
Steps:
1. Fork the main client to a client-specific repository in bitbucket2. Connect the main repository as upstream
After forking the repository in bitbucket you need to add the main repo as an upstream repo
$ git clone bitbucket.com:netfluence/clientA.git
$ cd clientA
$ git remote add upstream git@github.com:netfluence/mainRepo.git
Each time the main repo has an update, you need to update the client repository too
Get latest releases from master to the client repository
$ git checkout master
$ git fetch upstream
$ git rebase upstream/master
Push the updated master to the client repository
$ git push origin master -f

Update your develop branch as well
$ git checkout develop
$ git rebase maste
$ git push origin develop --force

Update your feature branches too
$ git checkout featureBBB
$ git rebase develop1
$ git push origin featureBBB --force
Sending changes to upstream/main repository
Sometimes there are changes in the client repository that the main repository needs. You can send out changes from the client fork repo to the main repository using a Pull Request.
Note: Consider cherry-picking changes before creating a pull request. This gives more control on what should be merged back to the upstream repository.